søndag 26. oktober 2014

More scenery for 40K

I did some more scenery work this afternoon. First of all I did some details on my Sanctum Imperialis. I still haven't added the final pieces in the back of the building, and I decided as I worked today that I don't want to destroy the gate. I will find some other rubble to add.

Here is a picture of the Sancum Imperialis seen from above. As you can see, there is a whole roof on the top of the first floor, and then I made one stripe of roof on the second floor as the front wall is intact.


I added some eagle pillars to the corners and one on each side of the gates. I love these eagle pillers...


The balcony looked ok when I left it after I had glued it together, but unfortionately it got crooked while drying, so it's a good thing the second floor is mostly in ruins...


Here you see the entire front of the building. I think it came out quite alright, and I am sure it will look nice after priming and painting.


Then I also built a Basilica Administratum. I only have one of these buildings, so I decided to build it so it looks like the box art. I knew I wanted the chance to have one figure all the way at the top of the bulding as it is quite tall, so I added a floor tile (or roof tile) over the structure and added some wall in front of it. Becaue the building is so battle damaged, I added two Imperial eagle things (same as on the balcony on the Sanctum Imperialis) but decided to give them serious battle damage, One in the back of the picture is cut nearly in half, while the one in the front of the picture is almost completely gone.


This is how the building look from the inside. I have added floorboards from other boxes as I had some left that was already cut to the correct length. I added what floor panels I could to the walls, to get the maximum space available to put minis on at a later time.


The building has two sides, and they are absolutely identical, so here is one side. As you can see I have added some lamps to the sides of the door, and some eagle heads to the second floor. Since it is an Administratum building, I feel it is important that is is decorated.


Here's the best shot of the building. The original building have some nice looking pillars, but I think it is hard to add it in a good way to the panels, so I am considering maybe just adding two eagle pillars from the Sanctum Imperialis box I have left to the corner of the building, and then I will use the beautiful pillars on another building I plan to build.


lørdag 25. oktober 2014

Greenstuff class completed

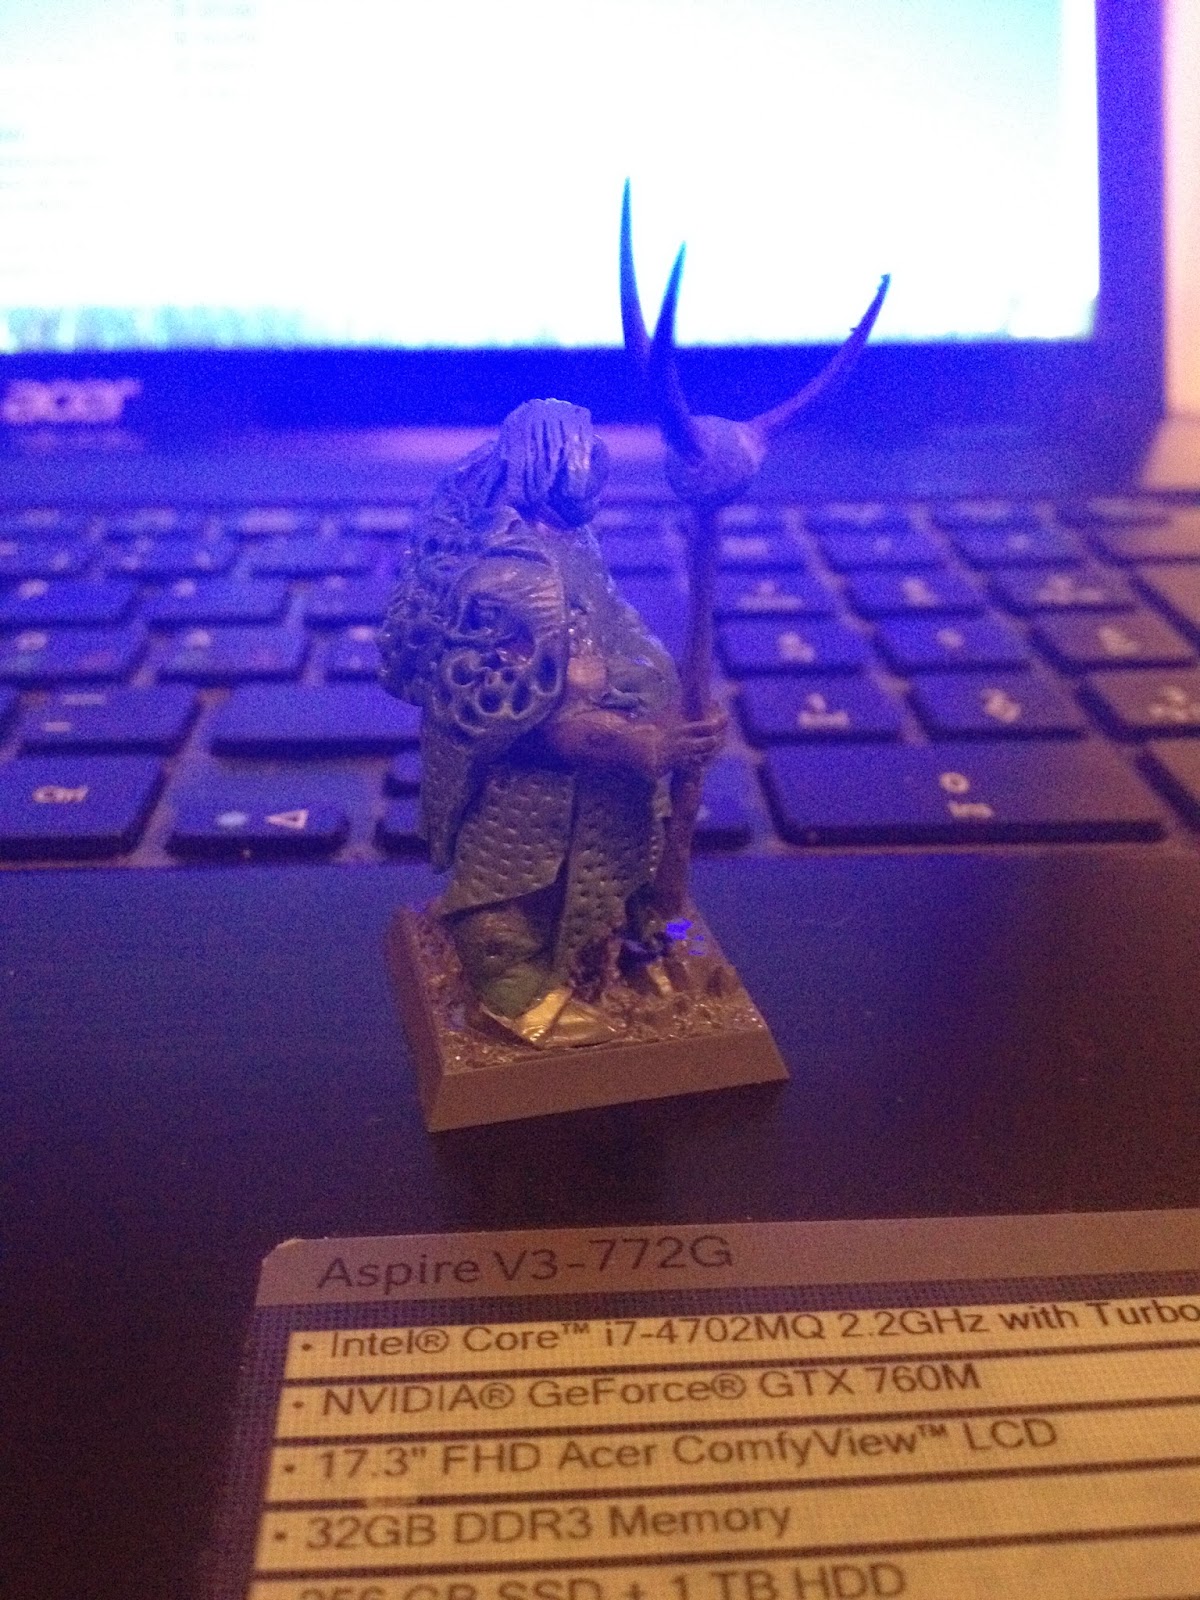
I was attending a greenstuff class today at Games Workshop in Oslo. It was really interesting, and I learned a lot. The idea was to take a chaos character and change him more or less completely.

Our teeacher was the Greenstuff Wizard known as Mats, and he shared from his great wisdom.
We were 4 people around the table, and that made it easy to get both the instructions and personal hints to learn the best way possible.
We started out at 11 a.m. with this, a Nurgle Chaos Lord


The first thing we did was de-nurgling the Lord by removing the head, the spikes and taking the axe away. Then the surfaces was smoothed out, and we started to fill in the nugle rot with greenstuff.

Then we learned to sculpt a face, and to me that was perhaps the hardest part of the day. I have made myself a promise today, and that is not to make heads unless I need to. I might enhance some heads, but creating one from scratch was really hard. I think the other participants made a better job with their faces, as my figure got a face only his mother could love. Still, it looks a lot more human than the original head.

After the head was made and lunch was eaten, we started on making pieces of chainmail, and after that we made the hair. Some of the others went for long hair and dreads, but i went for the Mongolian bucket-cut for my fellow.

The last thing we learned was how to make fur (yes the thing on his shoulders and upper back is supposed to be fur).
I didn't get the fur exactly right, but I learned the technique for making it, and with time and practice I will make it better on other minis.


This heavyset Norseman has lost his left arm, so the chainmail is just hanging loose where his arm used to be. He was a blacksmith before he went to war. He wasn't from a rich family, so he made his weapon from a pitchfork. The pitchfork is made from the shaft from the axe (the part below the hand), then sprue has been cut to make the top half. The little ball is made from greenstuff, and the spikes are the ones that was cut off from the left shouldeguard.
I hope I can field this fellow as a leader of a group of Marauders, but if he looks really out of place with them then i might get myself a unit of Empire Free Company or a Flagellant Warband and chaos them up to fit this fellow.

onsdag 22. oktober 2014

Sanctum Imperialis done

I have all but finished my Sanctum Imperialis plan.
The buidling ended up four sections wide and three sections deep.
The first floor has a full roof, and then the second floor is ruins. The front wall is intact, but the other walls are built from wallsections that all have some battle damage.
The building has a balcony over the front gate, and the doors of the gate on the second floor are open.
To open the doors I had to cut them open with a hobby knife, but that worked fairly well. Only problem is that when I added a floor the area behind the doors was heightended a few millimeters and that is just enough to make it impossible to put the open doors in to the doorframe.
Still, I think it will look ok, and go unnoticed when the building is done.

I have one more thing to do, and that is to add the back door, but I plan to do this after I have done my greenstuff training, as I think I will need to do some tricks to make this door and door frame look like a ruin.


lørdag 18. oktober 2014

More ruined buildings and an update

When I built my modified Skyshield I used wallsections from three boxes of Manifactoum buildings. I only used sections that were impossible to see through, so I have several spare wallplates, some are whole and some are just partial wallsections.
When I was at Games Workshop today, I had a look at how they had solved the issue with spare wallsections, and decided to have a go at something similar.
I have always said that I would like to build several buildngs from my own mind instead of from the Citadel instructions that comes with the boxes, but seeing how several wall picees could be set up to become a totally ruined house was really someting I hadn't thought too much about. So today I sat down and assembled some wallsections with no other purpose but to be one wall.

I made one really small building, with two wallsections and two ruined walls, so that it looks like one corner of the building has taken a direct hit from a big gun. Not sure what kind of building it has been originally. Had it been a 1980's building I would have called it a phone booth, but I doubt they have that in 40K... I might add details to it later to clarify what it is, but for now it is a great place to hide a sniper.

I made a small ruined wall where the floor is almost intact but with no roof at all, and one building where one wall is intact and with roof. I will probably go back to this building and add another floor if I can get it to fit. Not sure how that will work inside manifactorum wallsections, as there are things sticking out here and there, but I might just do some more cutting...

I've also planned how to buid one Sanctum Imperialis. I will make the entire first floor, intact and with a roof. Then I will build a second floor that is in ruins like on the original building, but maybe with a few more ruined corners. This depends a little bit on how many ruined corners there are in the original box. But I have three or four  boxes, so I am sure I can manage.
Then the rest of the tiles will be used for different smaller ruins.

I have one Basilica Administratum, and I plan to build this fairly like the design on the box, but when I start to assemble it I might get some ideas...

One unopened Manifactorum box will be used to bild one manifactorum building, but I haven't decided how it will be except that it will have a big chimney.

Next Saturday I will take part in a greenstuff class at Games Workshop where we will learn different techniques for greenstuffing. We will use a Nurgle Chaos Lord for the purpose, and a whole lot of greenstuff. Hopefully this will give me some tricks to use for converting other minis as well, as that is one thing I don't do that well as of now. Every time I use greenstuff on a model it looks as it has gotten a plaster cast because of a broken limb.

søndag 12. oktober 2014

some pics of the special Skyshield Landing Pad

Please bear in mind that this is pictures of something still under construction. I might have to fix some gaps with liquid greenstuff still.

Here is the wide end og the building. At this end the building is just one floor with the landing pad on top. The doors in the middle and the wall section on the far right are from the Sanctum Imperialis set. That is also the fact with the eagle figures placed at both ends of the building, as well as where the building goes from four wide to two wide.


This is the building seen from a high view. From this angle it looks a little bit like an aircraft carrier from our times. The tower in the background with all the big sculls is the modified Deathknell Watch.


A little better view of the front part of the tower. The thing standing on top of the tower is the gun from the Aegis Defence line. The little thing on the left is a communications array from the Aegis Defence line box. There is a lightpost to give light if needed, and a ladder up to the roof so that the quadgun can get its maintenance and extra firepower can be added if that should be needed.


And here we have the building as seen from the opposite side of picture number one. The doors on the ground floor are the same doors as on the first picture. Actually this picture is taken before the last upgrades, as the eagle pieces mentioned in the commens of the first picture is missing on this one. There are eagle figures on both the corners in the front of the picture and on the corners that is visible under the landing pad almost in the middle of the picture.


Bikers are now fully assembled

I have finally finished the Ork bikers. There are a few small pieces to paint still (like the handlebars on the side where the original ones were cut off and replaced with the ones attached to the arms), and a few other minor details here and there that I noticed I had forgotten to paint earlier.
Getting the heads to fit was a bit more problematc than I had thought, but I think I managed to get them attached in an ok way. If I didn't it still is ok, as Ork anatomy differs some from human anatomy. I can always play that card...
Pics of the unit and of the trukk will come when I have painted the little things missing on the bikes.

I have also finished buildng the specially made Skyshield Landing Pad. I need to go over the model and see if I need to use some liquid greenstuff. I think I got the biggest gaps with regular greenstuff while fixing the huge gap I had to cut in the landingpad to fit the second floor of the tower to the rest of the structure. I had to put in a plastic slab made from a pole from the Manifactorum set, and then fill the rest with Green Stuff. Think it will look good when I get it painted, but right now it looks a little weird. I have taken some pics and I'll put them in a post of their own right after this post is out.

I also used regular green stuff on the "windows" of my modified Fantasy tower, to get rid of the huge ammount of sculls. But looking at how things turned out, I have decided to just leave them as is when I buld the tower out of the box. From a seller on Ebay I replaced the parts I had to take from my second box to create the modified tower, so I will build one tower that looks like the box art.
Then it comes to painting fantasy towers, I saw some pretty amazing pics of how another miniature builder had ddone it, and I will see if I can do something similar. I won't copy him, but I will use his pictures as inspiration when I plan the way I want to do it. One of the things I really liked, was that he had the stone stairs in a different colour than the tower itself, giving the impression that the tower was built from rocks transported from somewhere, while the stairs was just carved out from the rock the tower was set upon.

I managed to assemble two Imperial Bunkers from the Wall of Martyrs series, so I now have three bunkers assembled. The first one is partially painted, but I'm missing the details on the dead troopers and their equipment lining the walls. Since this is very detailed, it will take some time to complete, but it is important to paint it up in original colours before I dull it down and make it look old and weathered with washes.

I also assembled and glued together (what little needed to be glued) one of my Imperial defence emplacements. It has three defensive positions, each perfect for one heavy weapon team, and two end pieces. I plan to keep it all separate so that I can assemble the trenches and place the bunkers and weapon systems excactly where I want when I want to play a game or just display it.
Also this makes transportaion a lot easier as the items can be packed more easily in to transport containers.


tirsdag 7. oktober 2014

And already we have the month of October

I haven't been able to paint as much as I would have liked since the last update. There are 3 main reasons for this.
1. My Niece and Nephew was visiting me one entire weekend. This was very nice and I liked it a lot, but it didn't get any models painted. I did get to play Wii-U and build several Lego sets though...
2. Work has been taken up a lot of time, and that certainly don't get much painting done.
3. After a very long day at work I tend to fall asleep on the couch in front of my laptop before I can get down to my hobbyroom.

Still I have gotten a little bit done since the last update...

I have finished som more on the Snap-tite Orks, and they are just missing a few tiny details before they are done. Some horns that need a metal finish and a few details on the magazines on two shootas.

The Ork Bikers are a long way closer to being finished. I have finished painting everything except some details on their heads, and there are a few details that needs to be glued on. The heads (as they are still being worked on) and the front bumper things are missing on all three bikes, and the lead bike is missing a bosspole with a Grot. This was painted up on my last session and will be glued on in the next.

The Meganobs and the BigMek got some unpainted small details finished yesterday, and I also finished painting the wires for the teleporta, Next session I will glue the wires on to the device, and complete the BigMek.

I have not gotten any more done on my Chaos Cultists or the Chaos Warriors, but there are not much left before they are ready for the final wash and basework.

I have several Orks in varius stages of completion on my shelves, and one tray of Orks has gotten some work done since the last time. It is about 20, and a few of them had their armour and "uniforms" painted black from earlier. Now they all have green skin, and the next step will be to paint the black on the ones missing that colour.

I have also gotten som more scenery work done. My Warhammer FB tower is assembled and ready for painting. This will be done with a black spray basecoat, followed by grey (hopefully drybrushed) stones.

For Warhammer 40K I have almost finished a Skyshiled Landing Pad built form parts bought on Ebay and two (might be three before I am done) sets of Manifactorum buildings.
The Landing Pad is glued on to the top of a building designed 4 wallsections wide. Then I have the building go a little further than the Landing Pad itself, so that I can add a second floor to a small section of the building to make an entrypoint from the Landing Pad and into the building.
I don't have the exact usage for the building yet, but I am quite sure this will come to me at a later time.